DirectX 12 is a graphics API developed by Microsoft and is typically included with Windows operating systems. However, it’s always a good idea to ensure that your system has the latest updates and drivers installed to make the most of the features and performance improvements offered by DirectX 12. Here’s a step-by-step guide on how to check and activate DirectX 12 on Windows 11:
Step 1: Ensure Windows 11 is Updated
- Press the
Windows keyon your keyboard or click on the Windows icon in the taskbar to open the Start menu. - Click on the “Settings” icon, which looks like a gear.
- In the Settings window, select “Windows Update” from the sidebar.
- Click on “Check for updates.” If there are any pending updates, allow them to download and install.
Step 2: Verify Graphics Driver Compatibility
- Open the “Device Manager” by right-clicking on the Start button and selecting “Device Manager.”
- Expand the “Display adapters” section.
- Right-click on your graphics card and select “Update driver.”
- Follow the on-screen instructions to update your graphics driver to the latest version. You may also visit the website of your graphics card manufacturer to download and install the latest driver manually.
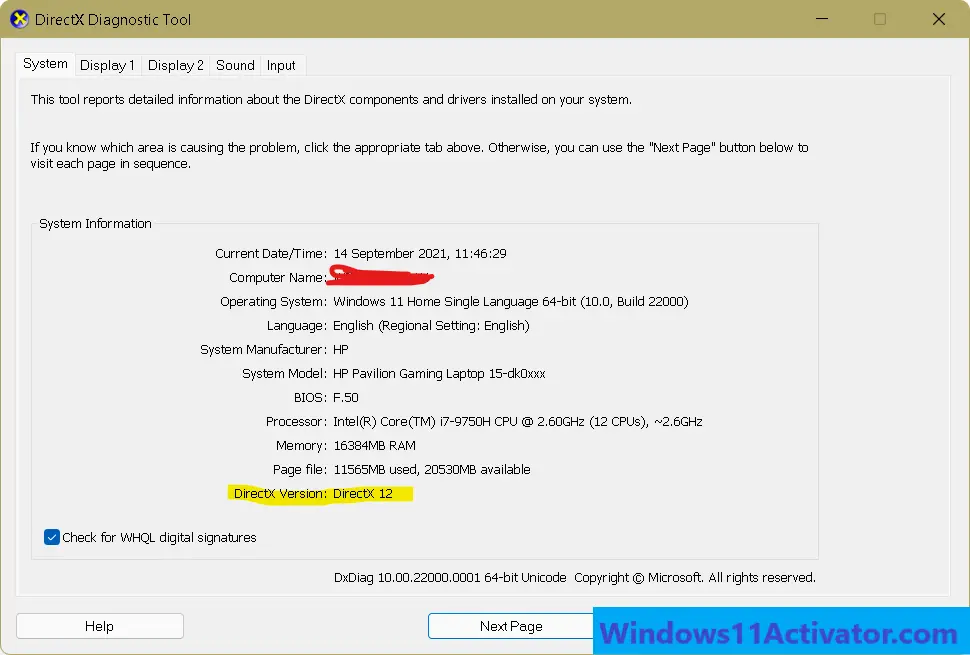
Step 3: Check DirectX Version
- Press
Win + Rto open the Run dialog box. - Type
dxdiagand press Enter. - In the DirectX Diagnostic Tool window, navigate to the “System” tab.
- Look for the DirectX Version entry. If it’s DirectX 12 or a later version, your system is already using DirectX 12.
Step 4: Enable Hardware Acceleration
- Right-click on the desktop and select “Display settings.”
- Scroll down and click on “Advanced display settings.”
- Under the “Refresh rate” section, click on “Graphics settings.”
- In the Graphics settings window, ensure that “Hardware-accelerated GPU scheduling” is turned on. This feature allows the GPU to manage its memory, potentially improving performance.
Step 5: Check DirectX 12 in Games and Applications
DirectX 12 is automatically utilized by games and applications that support it. Ensure that the software you are using is DirectX 12 compatible. Most modern games and applications should already be optimized for DirectX 12.
- Make sure your system meets the hardware requirements for DirectX 12.
- Disable any third-party graphics-related utilities that may interfere with DirectX.
Please note that the steps and menu options may vary slightly depending on future updates to Windows 11. Always refer to the latest documentation or online resources for the most accurate and up-to-date information.
Activating DirectX 12 on Windows 11 involves ensuring that your operating system is up-to-date, your graphics drivers are current, and your hardware meets the requirements.
DirectX 12, as a graphics API, aims to enhance gaming and multimedia experiences by providing improved performance and efficiency. By following the steps outlined in this guide, users can maximize the benefits of DirectX 12 on their Windows 11 systems. Download Windows 11 Activator for free to activate Windows 11. Get free Windows 11 Activator Tutorials from our website and fix your issues.